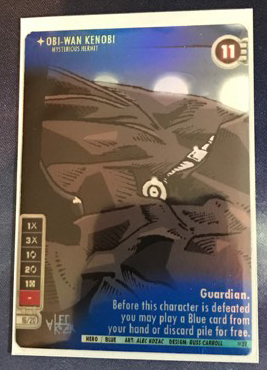
 At a past Store Championship event I placed in the top 8 for the first time and in that great event I received an alt art card that was based on Obi Wan Kenobi (SOR27). After see this card I knew I was hooked on the look and idea of Fan Alt Art Star Wars: Destiny Cards that played to exactly what the players were looking for or did not even know they were looking for. I wanted to know more about the process and what it takes to make these cards, to start I spoke with the man behind organizing and running the Store Championship at Game On in Prescott, Arizona. Russell Carroll has a great deal of knowledge in regards to creating and producing these cards and I asked him to explain the process in his own words.In this example, I had a friend whom I commissioned for the artwork so I would not be using another artist’s work without permission. I have yet to gain permission from FFG or Lucasfilm to reproduce their works, so proceed at your own risk. The intent of producing this unofficial proxy is for the person commissioning the card to have fun in a causal unofficial FFG Organized Play event setting. The card was a tournament prize and I did not profit from its creation or distribution. I suggest making proxies of cards you own already so that there is no mistaking that you own the card and that you can play the standard card at your opponent’s request.
A little background: I feel it is both helpful and fills this story out to explain what it is that I do. That may be pride speaking but I don’t care because I am proud of the work and what I have made / helped create for my gaming community. If you don’t like background / origin stories skip to <here>. I am a tournament organizer for not only Star Wars: Destiny, but also Star Wars Armada and X-Wing. My local gaming community consists of 4 small towns; the biggest being Prescott AZ (which is about an hour and a half north of Phoenix AZ the closest major city / large player group), Prescott Valley, Chino Valley and Dewey/Humboldt. Compared to Phoenix area, we are small. In December 2014, I had return to gaming after a very long hiatus. Previously, I had played 40k and Space Marine in my middle school days but when I reached High School my priorities changed. During college, I found Decipher’s Star Wars CCG; but that died once I left school. Fifteen years later, I discovered I missed collecting, competing, and painting miniatures, but I honestly did not realize it. I found FFG’s X-Wing from an online add and bought it for myself as a X-Mas present. Here were miniatures and Star Wars mixed into one and I was in love. Unfortunately; while my roommate and friends loved Star Wars and the game; they did not take it to the level I wanted to be at. After beating them repeatedly they no longer wished to play me. At the same time, I discovered the large Phoenix Squadron X-Wing community and was upset that in Prescott we had nothing like that. Thus, I decided to create a play group for myself with the help of a friend who had the same goal. After 2 years of work, we had a respectable community for X-Wing, close to twenty consistent players. One of the things I and my fellow tournament organizers prided ourselves on (and learned from Phoenix squadron) was creating our own prizes to add to the prize pool in addition to what the FFG OP kits had to to offer; something unique to our area and to entice new players to join the group. We had done acrylic tokens and regular alternate art cards up ‘til now. Due to a timing and logistics issue, we missed a cut off for applying for a FFG OP X-wing Store Championship and so I decided to make and Unofficial / Official Prescott Store Championship to be held in March 2017. I really wanted to outdo myself with prizing so I came up with the idea of a Foil X-Wing Card which also combined 2 commonly played cards into one card.
Thus, the Foil Palp Shuttle was born: 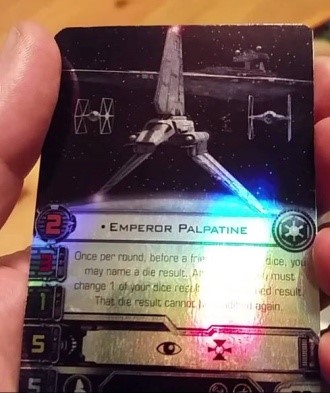
I then heard about this new game, Star Wars Destiny, coming out that was Star Wars, a card game, and dice game; I was hooked even before release.
Here is our local Destiny Group. I said to myself, “Here is a match made in heaven for the foil process.”
Here begins the process for what I went through to make a foil Star Wars Destiny Card. I will document how I made a Obi-Wan Kenobi: Mysterious Hermit. The first thing I did was find a YouTube video of a guy making his own foil cards out of foil magic cards, and I used this as a guide to make my cards (I will link it at the end). I recommend watching it to get a visual of my process.
Step 1: So now knowing the general idea I gathered the materials needed by it:
- Avery Glossy Clear Sticker Project Paper #4397
- Avery White Sticker Project Paper #3383
- Color Inkjet Printer with decent output (I use a HP 4630 AIO ~$100) – high end may be desirable but not needed
- Ink – it is best to have enough ink before you start as nothing is more annoying than stalling mid project with no way to print. XL / High Capacity cartridges are the way to go
- Adobe Photoshop or other free to use program like GIMP (I use Photoshop and when talking about the process will use terms relating to it)
- Foil Magic the Gathering Cards: Born of the Gods or Journey to the Nix work best (as they are inexpensive)
- Image of original card for reference / sampling
- Acetone & Paper Towels
- Guitar Pick or cell phone screen protector bubble tool
- Testors Clear Matte and Testors Clear Gloss Finish spray cans
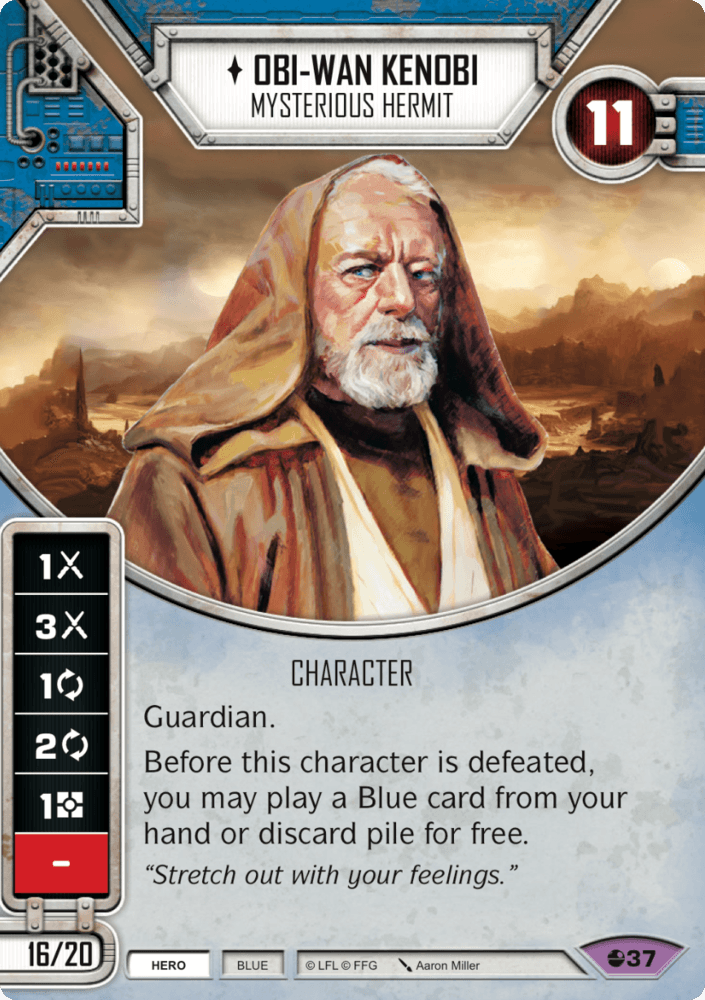
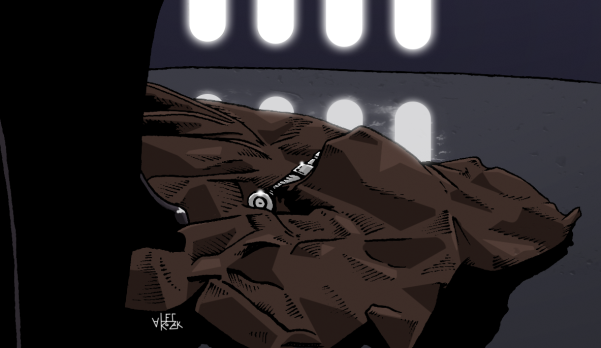
Step 2: While I waited for some of the supplies to come in the mail, I began creating / altering the art for the image using Photoshop. The original FFG card here. Next I chose an image as the basis for the card or rather an artist, Alec Kozac. This part was easy as I had seen my friend’s work before and think it is great, has a good sense of humor, and is my fellow TO in Prescott. I told him to create anything he wanted and that is was for Destiny. He came back with this:
Step 3: The layout and edit of the card. I created a new .psd file with the dimension of 2.5” x 3.5, as the magic cards are 63 x 88 mm (roughly 2.5” x 3.5”). I then inserted my friend’s artwork. Then, using Photoshop’s selection tool, I copied the dice sidebar and Hit Point display and placed them in layers on top of the art work. If you need help with Photoshop, Youtube is great. You can search for “changing the background on a photo” to get your feet wet with layers. Next, I added a new layer and using blue for color I used a brush tool with a spray-like output for the blue haze. I then added the text for the card’s name, title, and card ability text. Then, finally a bar at the bottom for side, color, art credit, design credit and card number. While I added this, I kept in mind that whatever is along the edge may be lost in transferring the printed art sticker to card. I then exported the image to a .png
Step 4: Removing ink from the card. Using the Acetone and a paper towel, I put the card on top of a blank piece of paper and, after adding a spot of acetone to the paper towel, rubbed gently on the card. You can use too much acetone, and if it seeps in from the edges of the card, it will ruin your card. After the spot on the towel accumulates a lot of ink, I moved to a clean spot on the towel and added another dash of acetone. Rinse and repeat until I am left with a clean and black foil card.
Step 5: MS Word and Printing. I use Word because it keeps the quality of the image and allows me easily to manipulate layout . . . I am also just used to using it, too. I use a blank page in MS Word and adjust the margins on all side to about 1/8”. I then insert the card image (.png) into the document to retain clarity. I adjust the size to be a width of 2.51” which, when I tab to height, maintains the aspect ratio and thus makes the height 3.51”. This allows for you print to be slightly bigger than the card so you don’t end up with edges of the card with no image. I can fit 3 cards-wide and 2 high with two more rotated at the bottom shown here:

I then print it on the Clear Sticker Paper #4397. You don’t want to waste the sticker paper, as it is relatively expensive and comes in limited supply per paper pack. Printing it on a test page at draft quality helps make sure you retain the card’s clarity within the allowable print area your printer can handle. Doing a high quality print, select high DPI / type: Graphics options in printer preferences will make sure your cards look the way you want them. Lastly print on the glossy sticker paper and make sure to select a high quality gloss as you paper source. Let it dry!
Step 6: Make sure to not touch the actual printout. I use a good pair of scissors to cut out a single card and careful remove the sticker from the waxed white paper back. I place the sticker print-side down onto a large piece of the waxy removed sticker backing so that the sticky side is up. Then, I carefully line up the top edge making sure the card is straight and centered on the sticker.

After centering and aligning it, I slowly depress the card down from the edge, moving slow and smoothly to the opposite edge, until the card has been completely attached. Next, I put a piece of paper on top of the back of the card, using a guitar pick or cell phone protector tool, and swipe from the middle to all outer edges to move air out. I then remove the top paper and the wax paper while only handling the card, from the edges as to not smudge the printed image. I then trim the excess sticker paper from the edge of the card.
Step 7: I apply a coat of Gloss or Matte finish to the card surface. Let Dry! I use gloss because it is more durable than matte unless I am looking for a duller look. Pick one depending on your desired look.
Step 8: Lastly repeat steps 2-6 for the back of the card using the Avery White Sticker Project Paper #3383. When it comes time to print, you card back change the paper source to Matte paper.
Thanks to Russell I had a clear idea as to what the process of creating a card looks like, but just because it sounded like fun I decided that I really wanted a card that to me would be a foil that was one of a kind. So Russell and I sat down and we devised a Star Wars: Destiny Alt card based on the most notorious gangster of them all Jabba the Hutt (AWK20). However, no regular Jabba would do as I wanted to blend this gangster from a galaxy far far away with one of my favorite rappers the notorious B.I.G also known as Biggie Smalls.
Through Russell’s Photoshop genius we were able to blend my ideas together to create a truly amazing card. That was one part Star Wars and one part rap legend and Notorious J.A.B.B.A was born.
 |
 |
 |
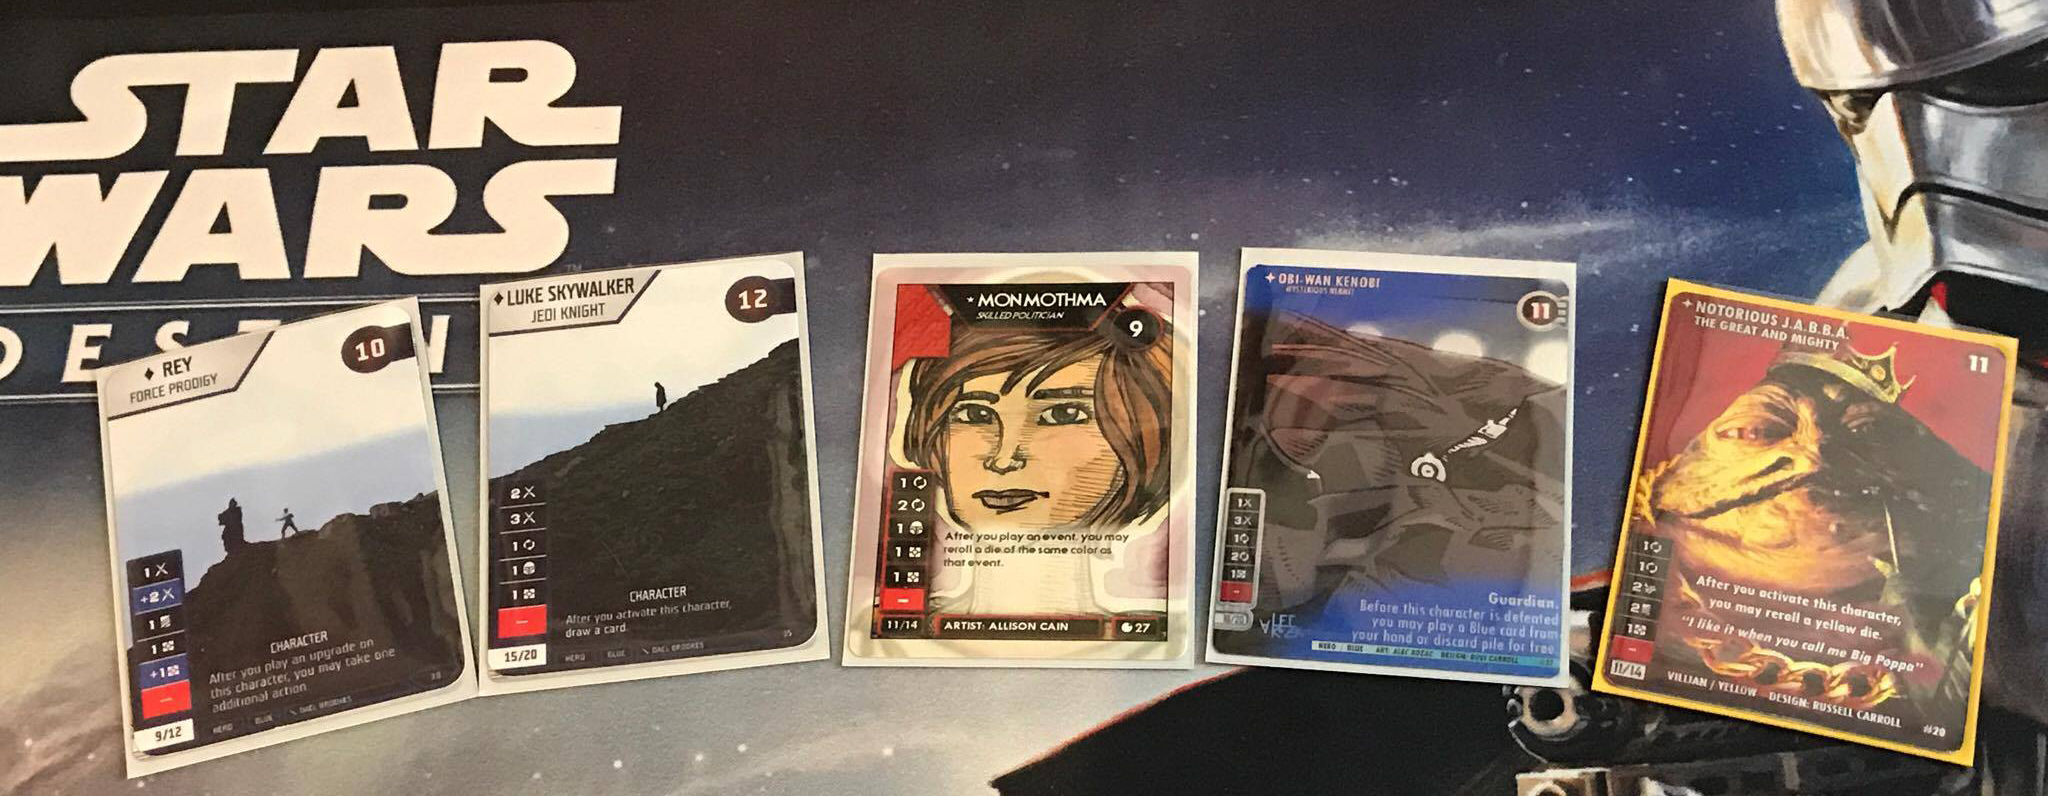
But I would love to hear about the experience that everyone else has had with Star Wars Destiny Fan Art Alt Card and which one or ones have been your favorite. Below I have a picture of my favorites, make sure to share yours! Also what ideas do you have for alt art cards, its time to make them a reality!
Support The Chance Cube
Do you enjoy the content provided by The Chance Cube? Would you like to connect even further with The Chance Cube Family? Consider supporting this content by joining our Patreon. We are a team dedicated to media coverage and community building, committed to bringing you the best of this game, sharing the joy and community that comes with it. Our Patreons enjoy membership in The Chance Cube Hangout, our Facebook group for supporters of the channel, and we have additional tiers that include gifts from us to you as a thanks for the generous support. Find out more at patreon.com/thechancecube.